Chapter 4 Modifying DaSEH Materials 
4.1 Learning Objectives
This chapter will cover how to modify the DaSEH resources to suit your own needs using the following methods:
- Modify the website
- Modify module lecture slides
- Modify module labs and lab keys
- Modify codeathon resources
4.2 Modify the Website
If you would like to make a copy of our website to modify for your own use, there are a couple of options.
You can “fork” our repository. This lets you keep track of changes that we make and send us suggestions if you’d like. This also allows you to use the same infrastructure that we did to create our website. Please be sure to update the website so that it is clear who ultimately made your site.
You can copy the files from our repository into your own website. To access the contents of the files, go to our repository on GitHub. This allows you to use whatever website setup you would like.
Under our CC BY-NC-SA license, you should also indicate that you are using our resources or a modified version of our resources.
4.2.1 Creating a Fork of our Repository
To create what is called a “fork” of our repository (which allows you to make your own version based off of ours) then look for the fork button on the upper right corner of our repository on GitHub.
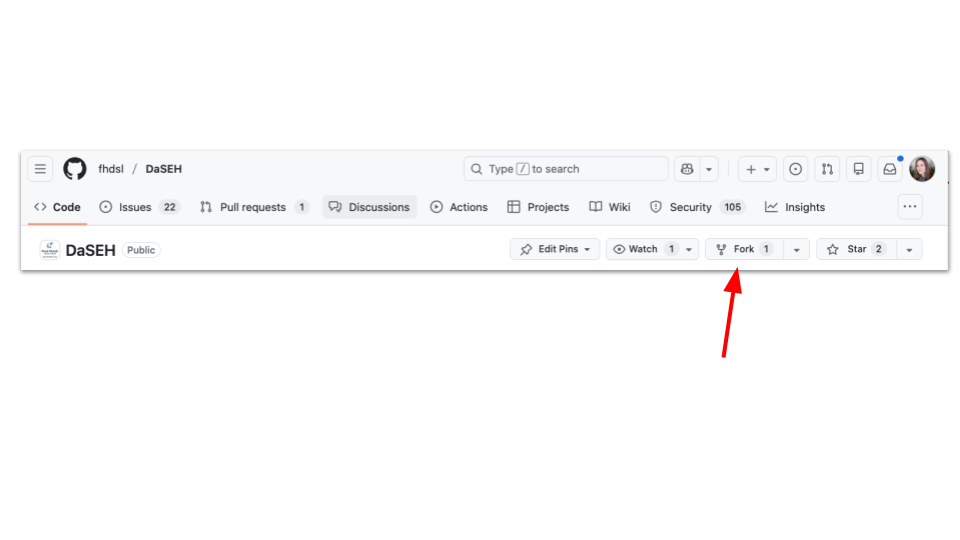
Once you click this, you will be taken to a new page where it will ask you what you would like to call your new repository.
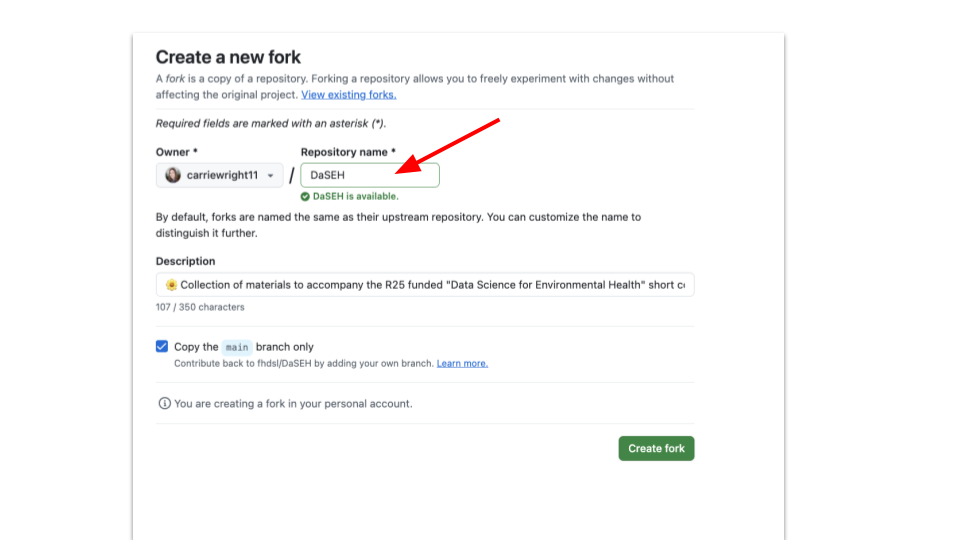
4.2.1.1 Create a New Fork
On this page:
- Change the Repository name for your course/use
- (Optional) select to have your repository as part of a GitHub organization (if you are part of one) instead of just using your personal account
- Change the Description field to explain what your use is and that are modifying our files
- Ensure that “copy the
mainbranch only” is selected - Finally, click the green “Create fork” button
Here is what the page looks like:
Next, to set up the website deployment you will need to do a few steps.
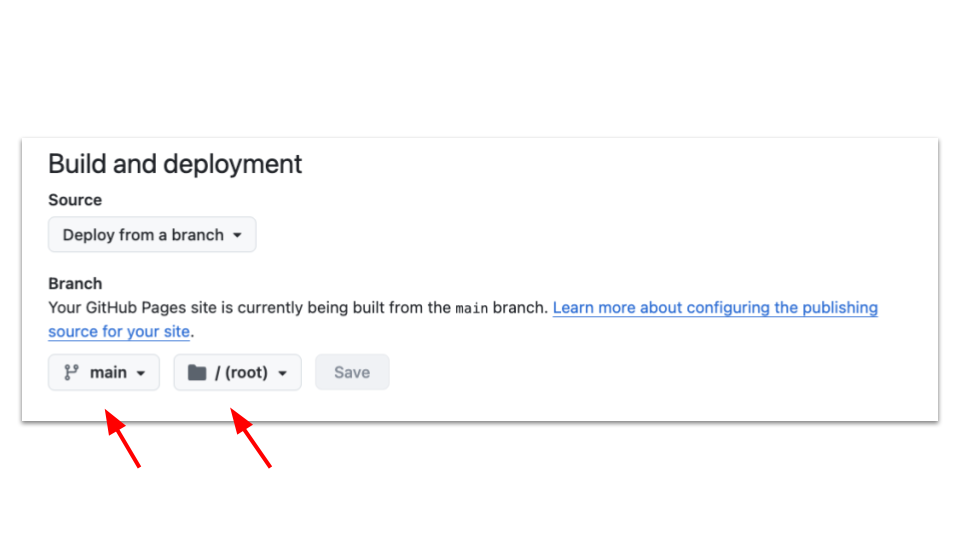
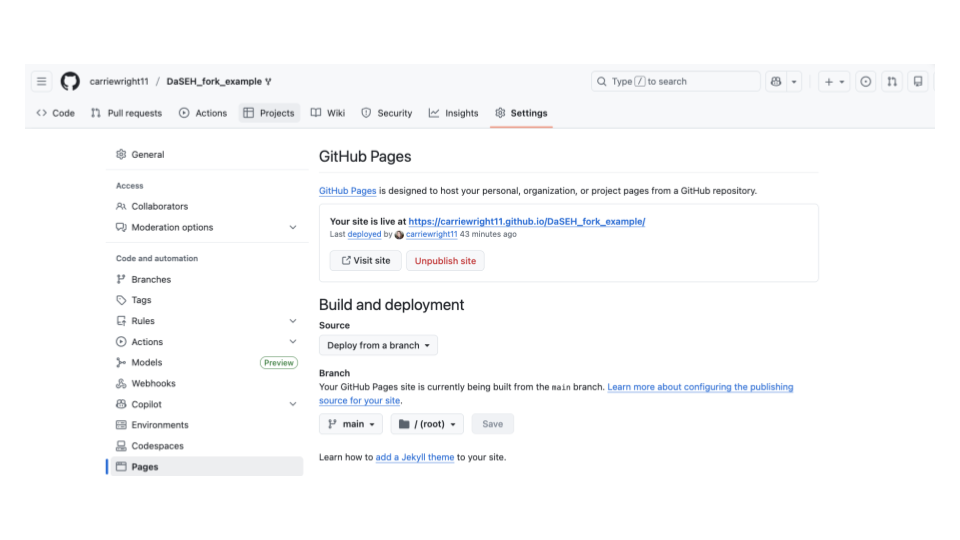
4.2.1.2 Website Deployment - Setup
- First go to the “Settings” page (top menu)
- Then scroll down to the “Pages” (on the left menu)
- Next configure your website to use the main branch (where it says “none”) and the root folder and press “Save”
4.2.1.3 Website Deployment - Create Secret
Next, we’ll create a secret (to give you the right permissions). This allows you to run the GitHub actions that we use safely.
- Click on your profile photo in the upper right corner
- Scroll down to “Settings” in the menu that pops up and right click to open it in a new tab
- Scroll all the way down on the left menu to the bottom and click on “Developer Settings”
- On the left side menu, click on “Personal Access Tokens”
- Select “Tokens (classic)”
- Click the “Generate new token” button that is in the upper right
- Select “Generate new token (classic)”
- Confirm your access with any two factor authentication if you have that set up
- Name your token
GH_PATin the “Note” section
Note that your token will expire based on the date that you set in the Expiration section. You will have to complete this process again when your token expires. GitHub will let you know as you will get an error about credentials. It is a good idea to use the default settings. You will just repeat this process when the time comes. This cheatsheet may also be helpful.
- Underneath “Select Scopes” (where the check boxes are), check “repo” (so everything under it is checked) and workflow
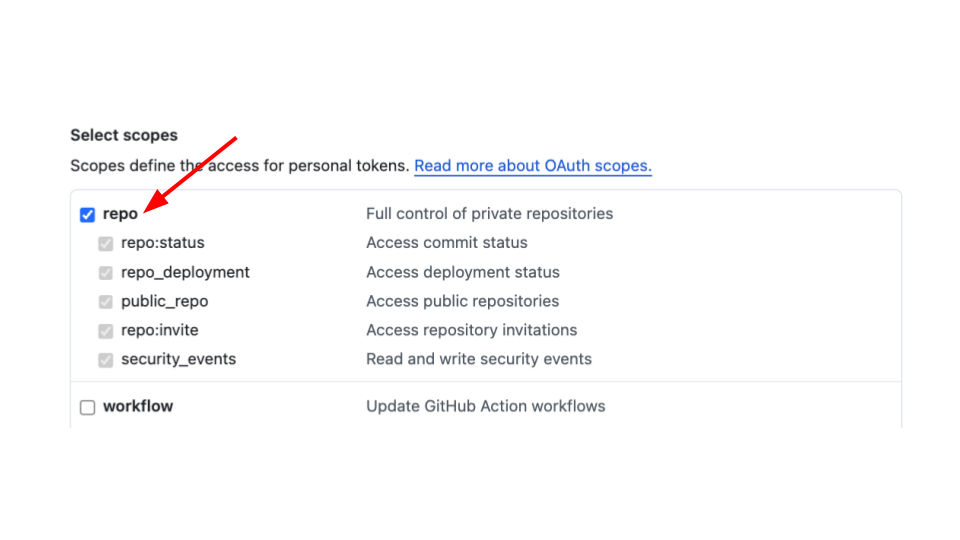
- Click the green “Generate token” button at the bottom
- Copy your personal access token (Note that you will note have access to it again, you can always however just make a new one)
DO NOT store your personal access token anywhere public!
4.2.1.4 Website Deployment - Add Secret
Now that your secret is ready, we will add it back to your website repository that you created from the DaSEH repository.
- Go to “Settings” at the top menu of your repository
- Go to “Secrets and variables” in the left side menu
- Click on “Actions”
- Under “Repository secrets”, click on the green “New repository secret” button
- Under “Name”, enter
GH_PAT - For the “Secret” section, paste the secret that you copied in the step above
- Click the green “Add secret” button.
Note that GitHub sometimes changes their website, so this process might change slightly. We will try to keep this information up-to-date however.
Nice! Now you are ready to modify your new website. You can find the link to your rendered website under the repository “Settings” tab (top menu) and clicking “Pages” (left menu).
You will see that the page now lists a link for your new website. You can click “Visit site” to see your website or copy and paste the link. This is the link you can share with students/learners.
Currently your website should look exactly like ours. Now you are ready to actually modify some files. To do so, go to the main page of your repository (the “Code” tab).
You can either:
- Click the green “Code” button to clone the repository, allowing you to work on your local machine (say in RStudio) - this is trickier but recommended as you can actually test any changes to your code on your machine
- Modify the files directly on GitHub
Please see this guide on how to make changes with either method: https://www.ottrproject.org/editing_website.html.
Note that lecture slides and lab files will be within the modules folder and organized by topic.
We will now talk about how to modify these files.
4.3 Modify Module Slides
The modules are written in R Markdown documents and developed within an RStudio project. R Markdown documents are denoted with the file extension “.Rmd” and allow for the inclusion of code chunks and outputs in a written report. They are written using Markdown syntax. RStudio projects are used to organize files. The knitr package “knits” the modules written in R Markdown and outputs the document as an HTML file. DaSEH uses these HTML files to post the materials online.
See the above sections about modifying the website to get the files used for the module lectures.
Each of the lectures can be found within the modules directory of our DaSEH GitHub repository.
Each module folder contains the lecture slides within the .Rmd file.
To edit a lecture, locate the appropriate directory within modules and edit the .Rmd file. For example, if you want to edit the Statistics lecture, you’d edit Statistics.Rmd in the modules/Statistics/ directory.

Do not edit the .html or .pdf files. These are automatically generated by GitHub Actions.
However, sometimes workflows don’t complete, so it’s always good to double check that .html and .pdf files are appearing as expected on the website once you have made changes.
4.3.1 Slide Formatting
These slides are made with something called ioslides. See this website for additional help with ioslides.
You will notice that ## is used throughout the file. This indicates the start of a new slide.
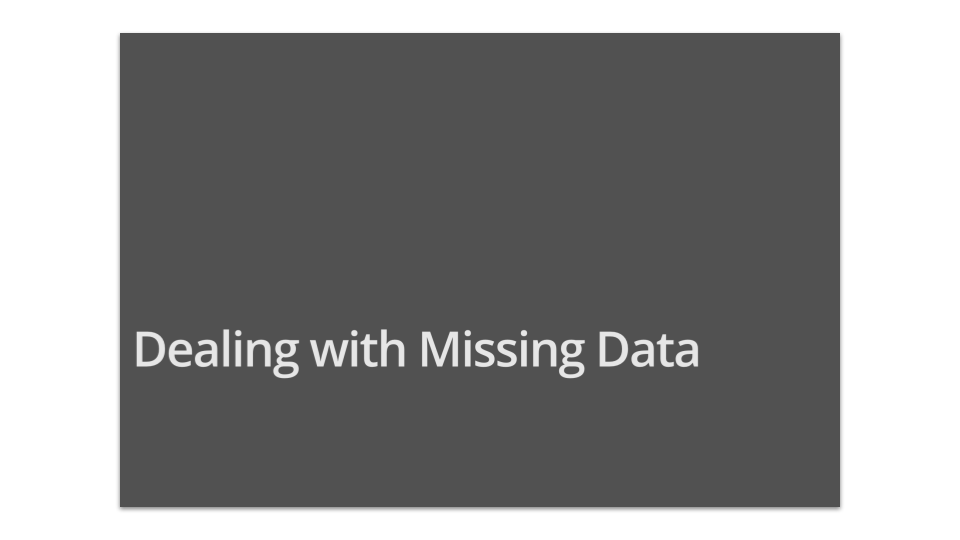
A single # indicates a new section slide, which will be a slide that looks like this:
4.3.2 Emojis in Slides
We recommend copying and pasting from here.
4.3.3 Smaller Text Font
If you want to change the style of a slide, modify the style.css file.
For example the style.css file contains the following, which creates a smaller font environment called .small:
.small {
   font-size: 0.8em;
}
To change the font of a single slide you can put {.small} next to a slide title like so:
## slide name {.small}
4.3.4 Smaller Code Font
The style.css file contains the following, which creates a smaller code font environment called .codesmall:
.codesmall pre {
    font-size: 16px;
}
To change a single slide you can put {.codesmall} next to a slide title like so:
## slide name {.codesmall}
4.3.5 Add Color to Slide Text
:::{style="color: red;""}
RED STUFF!
:::
or using HTML directly like this:
`Integer` is a special subset of `numeric` that contains only <span style="color: red;">whole numbers.</span>Integer is a special subset of numeric that contains only whole numbers.
4.3.6 Add Background Color
Background color can be added to code chunks to describe general syntax for code.
In the styles.css file is the following:
.codeexample pre{
  background-color: lightgreen;
}
To add this to a code chunk, use HTML in the .Rmd file before and after the chunk:
<div class = "codeexample">

``` r
#some code
```
</div>
4.3.7 Create Screen Capture gifs
To create video gifs, first record your screen like so (note this is for Mac users):
- Command + Shift + 5
- Select either entire screen - or more likely a portion of the screen button
- Click record
Next, convert the video to a gif using https://ezgif.com/video-to-gif. Be sure that you select “gif” as the output.
4.4 Modifying Labs
Within each module directory, there is a subdirectory called lab. Locate the lab subdirectory within the appropriate module directory and edit the _Key.Rmd file. For example, if you want to edit the Statistics lab, you’d edit Statistics_Lab_Key.Rmd in the modules/Statistics/lab/ directory.
Only edit the _Key.Rmd file. Do not edit the .html or .pdf files, or the _Lab.Rmd file. These are automatically generated by GitHub Actions.
The _Lab.Rmd file is automatically cleaned up for students to fill in during class.
4.4.1 How does the lab file cleanup work?
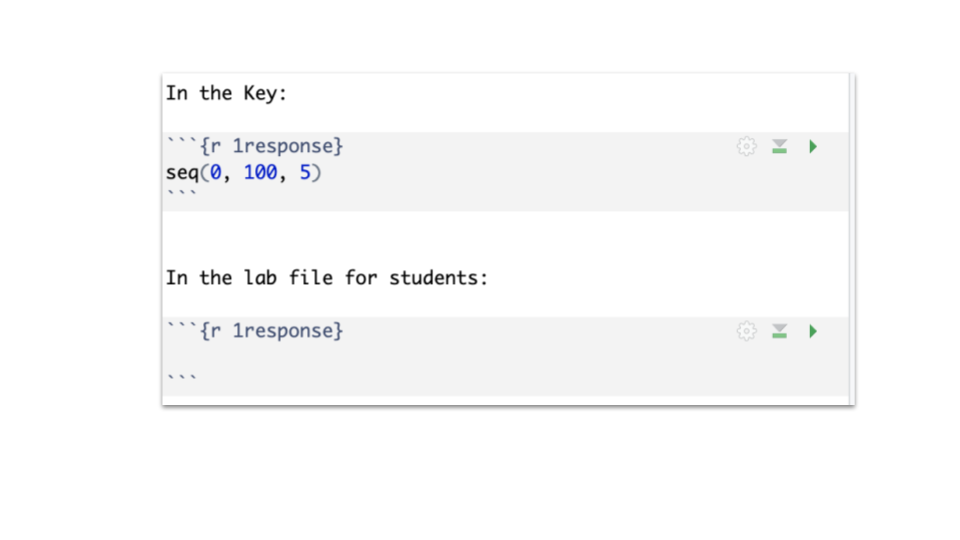
When creating the lab key, you will write the answer to the questions in the key. However, for the file that the students see, we want the answers to be removed.
To make sure this happens correctly, the chunks you want to clean must have a label ending with response. Chunks without a label following this pattern will be ignored and reproduced exactly for the students.
4.4.1.1 Manually Downloading from GitHub:
Download the
.Rmdfiles found in the modules directory of the GitHub repository. Download any relevant data files from the data directory).- The list of corresponding lectures is available on the materials and schedule page of the DaSEH website. Data files are listed on our data page.
Move the data files from your “Downloads” folder to your R session’s current working directory (you can see what this is with
getwd()). Open the files that you wish to modify in RStudio or wherever you like to work.
4.5 Modify Codeathon materials
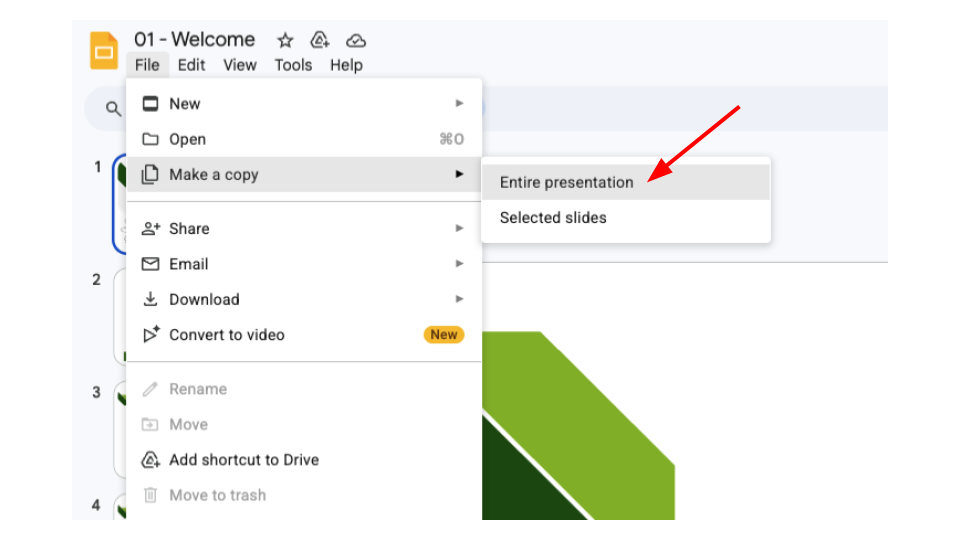
Our codeathon materials are Google Slide presentations which are available to view by the public. You can find iterations of these materials on Google Drive.
All slides will appear to you as “View Only”. To create a copy that you can edit, go to “File” > “Make a copy” and select either “Entire presentation” or “Selected slides”. You can also download in PowerPoint (.pptx) or PDF format.
4.6 Distribute Your Modified Content As You Please!
You can share HTML, PDF and Word files directly with your students or you can host your website for free on GitHub using GitHub Pages as described above.
If you are new to GitHub, also be sure to check out Happy Git with R.
Under our CC BY-NC-SA license, you will need to use the same license if you are distributing a modified version of our resources.
4.7 Session info
## R version 4.3.2 (2023-10-31)
## Platform: x86_64-pc-linux-gnu (64-bit)
## Running under: Ubuntu 22.04.4 LTS
##
## Matrix products: default
## BLAS:   /usr/lib/x86_64-linux-gnu/openblas-pthread/libblas.so.3
## LAPACK: /usr/lib/x86_64-linux-gnu/openblas-pthread/libopenblasp-r0.3.20.so;  LAPACK version 3.10.0
##
## locale:
##  [1] LC_CTYPE=en_US.UTF-8       LC_NUMERIC=C
##  [3] LC_TIME=en_US.UTF-8        LC_COLLATE=en_US.UTF-8
##  [5] LC_MONETARY=en_US.UTF-8    LC_MESSAGES=en_US.UTF-8
##  [7] LC_PAPER=en_US.UTF-8       LC_NAME=C
##  [9] LC_ADDRESS=C               LC_TELEPHONE=C
## [11] LC_MEASUREMENT=en_US.UTF-8 LC_IDENTIFICATION=C
##
## time zone: Etc/UTC
## tzcode source: system (glibc)
##
## attached base packages:
## [1] stats     graphics  grDevices utils     datasets  methods   base
##
## loaded via a namespace (and not attached):
##  [1] jsonlite_2.0.0   dplyr_1.1.4      compiler_4.3.2   gitcreds_0.1.2
##  [5] promises_1.2.1   tidyselect_1.2.0 Rcpp_1.0.12      webshot2_0.1.2
##  [9] xml2_1.5.1       stringr_1.5.1    tidyr_1.3.1      later_1.3.2
## [13] jquerylib_0.1.4  yaml_2.3.12      fastmap_1.1.1    readr_2.1.5
## [17] R6_2.6.1         generics_0.1.3   curl_7.0.0       knitr_1.50
## [21] tibble_3.3.0     bookdown_0.46    rprojroot_2.1.1  tzdb_0.4.0
## [25] bslib_0.6.1      pillar_1.9.0     rlang_1.1.6      utf8_1.2.4
## [29] websocket_1.4.4  stringi_1.8.3    cachem_1.0.8     xfun_0.55
## [33] sass_0.4.8       cli_3.6.5        magrittr_2.0.3   ps_1.9.1
## [37] digest_0.6.34    rvest_1.0.5      processx_3.8.6   hms_1.1.3
## [41] lifecycle_1.0.4  chromote_0.5.1   vctrs_0.6.5      ottrpal_2.0.0
## [45] evaluate_1.0.5   glue_1.7.0       spelling_2.3.2   fansi_1.0.6
## [49] purrr_1.0.2      rmarkdown_2.25   httr_1.4.7       tools_4.3.2
## [53] pkgconfig_2.0.3  htmltools_0.5.7
This work is licensed under a Creative Commons Attribution-NonCommercial-ShareAlike 4.0 International License.
![]() DaSEH is funded by the National Institute of Environmental Health Sciences 1R25ES035590-01.
DaSEH is funded by the National Institute of Environmental Health Sciences 1R25ES035590-01.