
Chapter 4 Making a GitHub Secret
4.1 Phase 0: Understanding GitHub Secrets
4.1.1 What Are GitHub Secrets?
GitHub Secrets are encrypted environment variables stored securely in your repository. They allow you to store sensitive information (like usernames, API keys, tokens, passwords) without exposing them in your code. Secrets are only accessible to GitHub Actions during workflow runs and appear as * in logs.
This assignment teaches you a fundamental skill for secure automation in research environments.
4.1.2 Why Personal Access Tokens Matter
Personal Access Tokens (PATs) provide secure authentication for GitHub Actions. They’re an alternative to passwords for GitHub authentication. They allow automated workflows to perform actions that require permissions (like creating issues, pushing to repositories, etc.). In research contexts, PATs enable automated data sharing, publication workflows, and collaborative tools
Important: PATs should be treated like passwords - never share them publicly.
Often, and in this assignment, you will begin by generating a personal access token in GitHub settings and storing that as a repository secret that can be utilized within workflows/GitHub Actions. But, as mentioned above, GitHub Secrets do not always have to be personal access tokens.
4.1.3 Best Practices and Security Considerations
4.1.3.1 Token Management
- Use descriptive names for tokens to track their purpose
- Set appropriate expiration dates - shorter is more secure
- Regularly audit and rotate tokens in production environments
- Revoke unused tokens to minimize security exposure
4.2 Phase 1: Creating Your Personal Access Token
4.2.1 Step 1: Navigate to GitHub Token Settings
Go to your GitHub profile (click your profile picture in the top right)
Click “Settings” from the dropdown menu (you will see a gear icon ![]() )
)
Scroll down to “Developer settings” in the left sidebar (at the bottom) ![]()
Click “Personal access tokens” ![]()
Select “Tokens (classic)” from the submenu
Navigation path: Profile → Settings → Developer settings → Personal access tokens → Tokens (classic)4.2.2 Step 2: Generate New Token
Click “Generate new token”
Select “Generate new token (classic)”
GitHub may ask for your password or a 2-factor authenticator (2FA) code - enter it to continue
You’ll be taken to the token creation page
4.2.3 Step 3: Configure Your Token
Add a descriptive note:
• Use something like “Secret Storage Assignment”
• This helps you remember what this token is for later
Set expiration:
• For this assignment, you can set it to 30 days or custom
• In real research, consider the security vs. convenience trade-off
Select scopes (permissions):
• Check “repo” - this gives full repository access
• For this assignment, “repo” scope is sufficient
• If using a GitHub secret in a GitHub Action/workflow, you may need to select “workflow” as well.
• In production, use the minimum required permissions
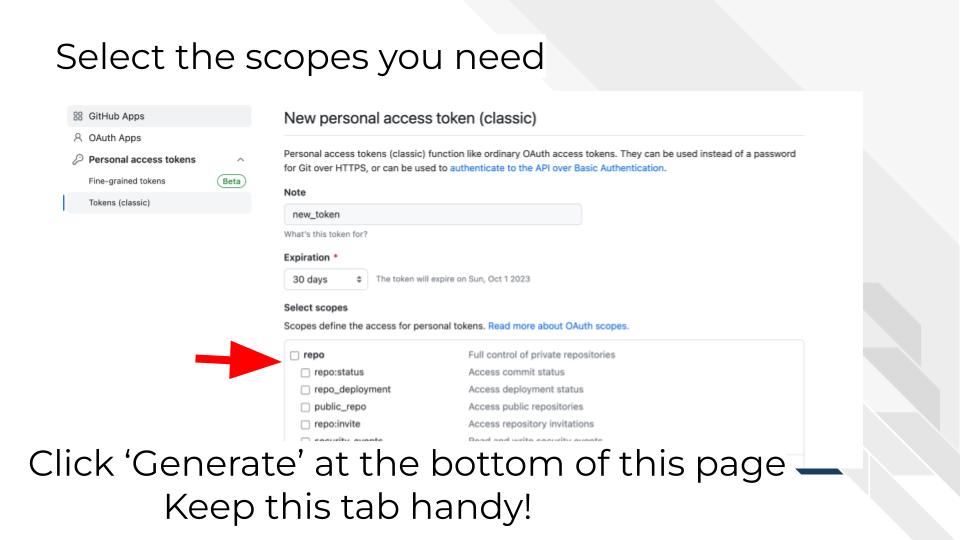
4.2.4 Step 4: Generate and Copy Token
button. CRITICAL: ![]() Copy the token immediately - GitHub will only show it once (perhaps keep the window open as you copy it)
Copy the token immediately - GitHub will only show it once (perhaps keep the window open as you copy it)
The token will look like: ghp_xxxxxxxxxxxxxxxxxxxxxxxxxxxxxxxxxxxx
Warning: If you navigate away without copying the token, you’ll need to create a new one! To create a new one, follow Steps 1-4 (within Phase 1) again.
4.3 Phase 2: Storing the Secret in Your Repository
4.3.1 Step 5: Navigate to Repository Settings
Go to your capstone sandbox repository (not your personal settings)
Click the “Settings” tab ![]() at the top of the repository page
at the top of the repository page
In the left sidebar, find “Secrets and variables” ![]()
Click “Actions” under “Secrets and variables”
Repository navigation: Repository → Settings → Secrets and variables → Actions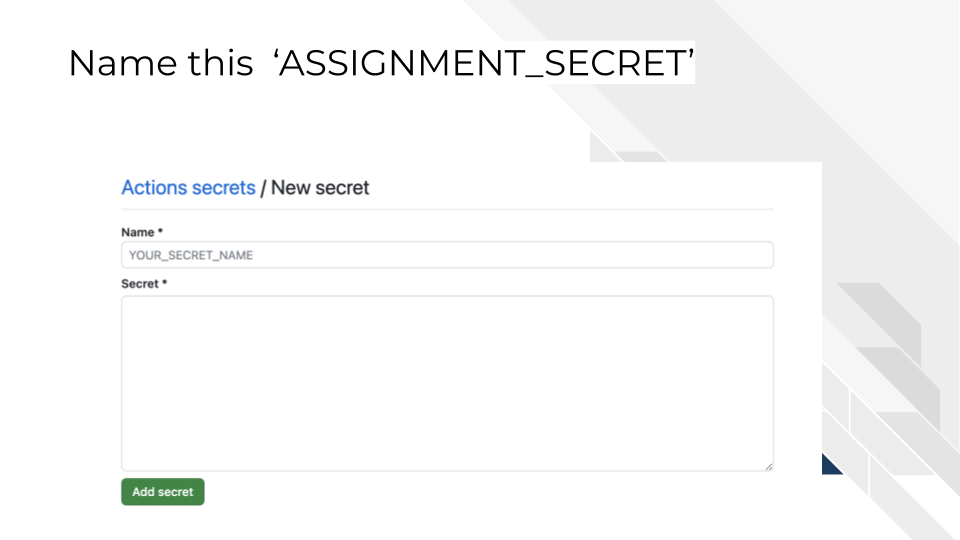
4.4 Phase 3: Testing Your Secret
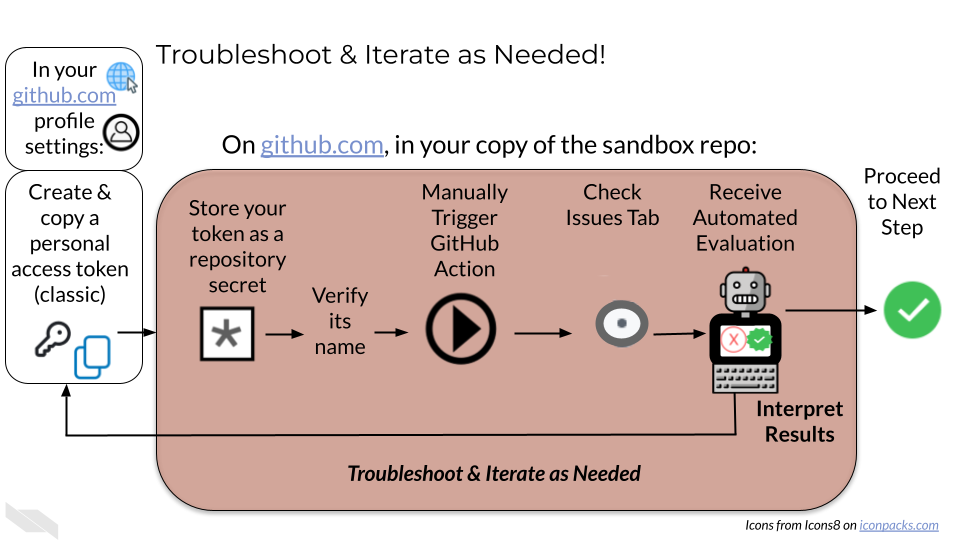
Because you’ve made changes to your repository settings, but not changes to the files within the repository, we can’t open a Pull Request to run an automatic test/evaluation of your work. Instead, we’ll have to manually trigger the GitHub Action Evaluator Test.
In order to report success or failure, the test will open an Issue in your GitHub repo (since there is no open Pull Request to comment on).
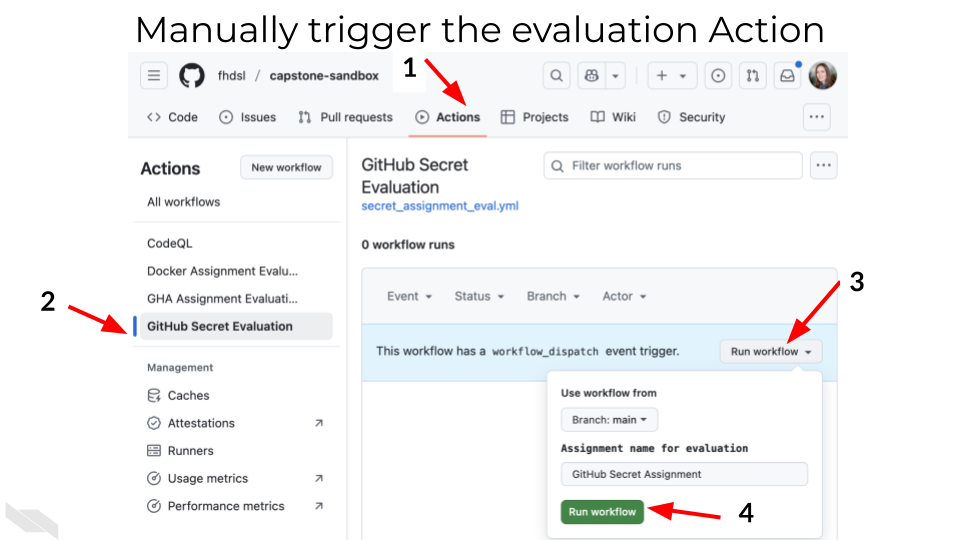
4.4.1 Step 8: Trigger the Evaluation Action
Navigate to the “Actions” tabLook for “GitHub Secret Evaluation” in the workflows list on the left
Click on “GitHub Secret Evaluation”
Click the “Run workflow” dropdown (you may need to select branch “main”)
button again to confirm
4.4.2 Step 9: Monitor the Evaluation & Interpret the Results
The evaluation will take a few moments to check if your secret exists and is valid. Don’t worry if it takes a minute - the system needs to verify everything is configured correctly
Watch for the workflow to start running (you’ll see a yellow circle, then green checkmark or red X)
Navigate to the “Issues” tab in your repository
Look for a new issue created by the evaluation system
Click on the issue to see detailed results
Interpret the results and proceed accordingly:
If the issue title indicates success, and the description of the issue contains a validation, skip to Phase 5.
If the issue title indicates failure, and the description of the issue contains error messages, visit Phase 4: Troubleshooting and Refinement of these instructions.
4.5 Phase 4: Troubleshooting and Refinement
4.5.1 Step 10: Debug Failures
4.5.1.1 Secret Not Found:
Verify:
Check the secret name: Must be exactly ASSIGNMENT_SECRET
Verify secret location:
Must be in repository secrets as described in Step 6, not personal settings
Secret is stored in the correct sandbox repository (not fhdsl/capstone-sandbox but instead your own copy)
Re-create if needed: Delete and recreate the secret with correct name
4.5.1.2 “Invalid token” Error
Verify:
Token was copied correctly (no extra spaces)
Token hasn’t expired
Token has ‘repo’ scope permissions
Token was generated for the correct GitHub account
What to do to fix:
Generate a new PAT: Your token may have expired or been created incorrectly
Check scopes: Ensure “repo” permission is selected
Update the secret: Replace the old token with the new one
4.5.1.3 Workflow Doesn’t Run
In this case, if the workflow doesn’t run, it won’t create an issue reporting on success/failure or you may not be able to find it to manually trigger it in Step 8.
Ensure:
You’re triggering from the correct repository
You’re selecting the main branch
The workflow file (secret_assignment_eval.yml) exists in .github/workflows/
You have permissions to run workflows
4.6 Phase 5: Completion
If you are taking this course on Coursera:
Collect Your Validation Code
Once your evaluation action succeeds, copy the validation code from the Issue description. You’ll need the code in order to submit your quiz.
Submit Your Quiz on Coursera
Go to your Coursera Graded Assignment (“Making a GitHub Secret”)
Paste the validation code exactly as provided in the issue
Submit the quiz to get credit for your work
4.6.1 Clean Up (Optional but Recommended)
After completing the assignment:
Consider revoking the PAT if you don’t plan to use it further
Delete the secret if it’s no longer needed
Reflect on/Document what you learned about secret management
This assignment teaches a crucial skill for modern computational research: secure credential management. In real research environments, you’ll use these same techniques to store API keys for cancer databases, authentication tokens for computing clusters, and credentials for automated research workflows. The ability to securely manage secrets enables sophisticated automation while maintaining security standards required for sensitive cancer research data.