
Chapter 2 Introduction to Git
2.1 Why version control?
As the book ProGit puts it, “Version control is a system that records changes to a file or set of files over time so that you can recall specific versions later”. You probably have tried some form of version control yourself: the simplest form of version control consists of carefully duplicating and organizing your files that you have a history of your edits, but that is prone to inconsistency and errors. Git is a version control software that does this systematically for you.
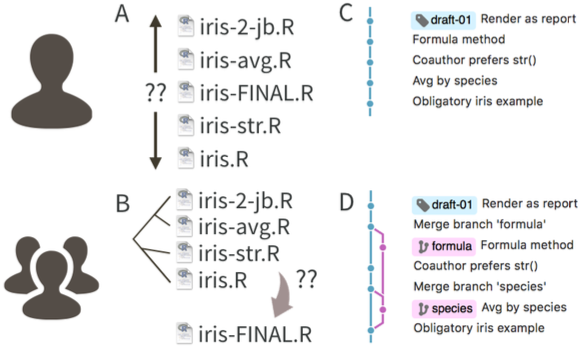
GitHub is a website that allows you to store Git projects remotely online. It facilitates collaboration, open-source coding, and provides user-friendly features to work on multiple versions of a project simultaneously.
In this workshop we will focus on the fundamentals of Git and GitHub.
2.2 The Git Data Model
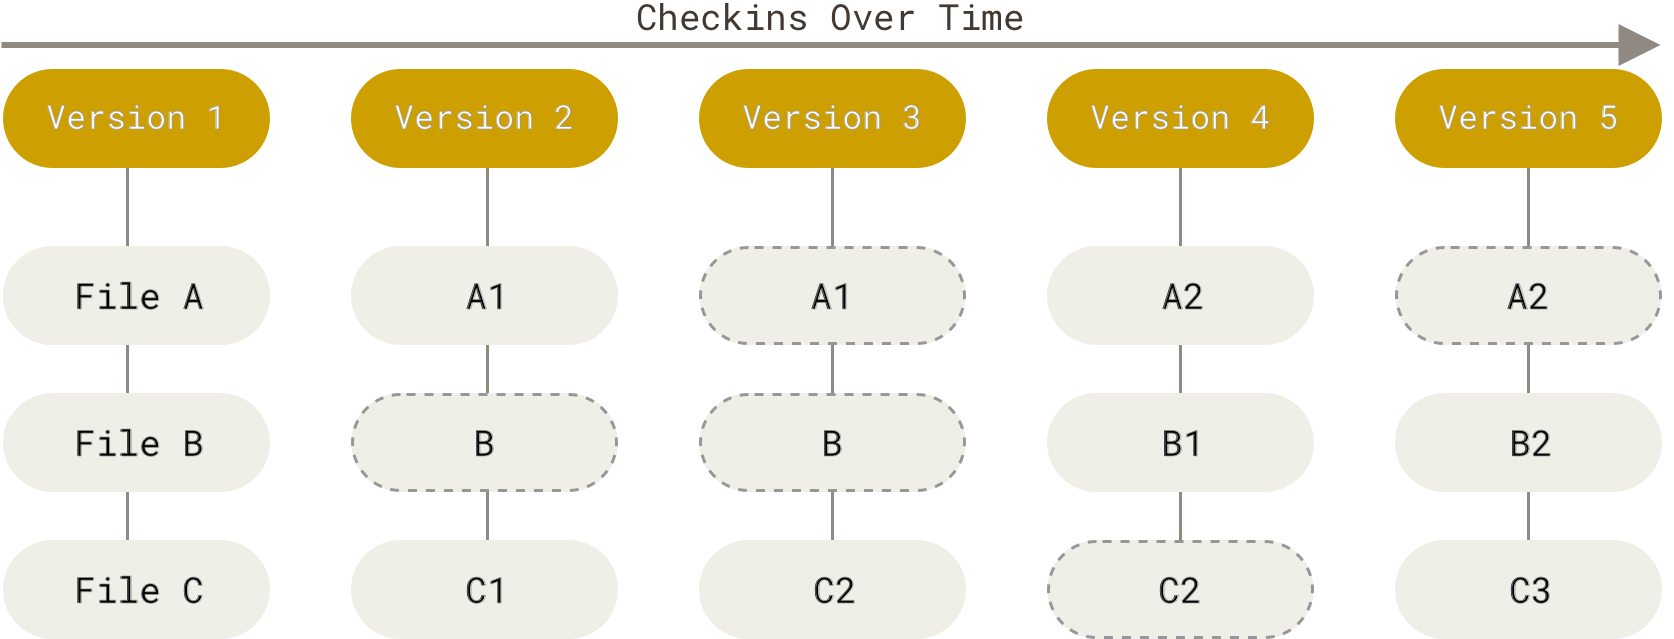
Let’s formalize Git’s version control system: Git keeps track of a project within a designated directory, which is called a repository (also known as repo). After you make some changes to the files in your repository, you can save the state of your repository by asking Git to make a commit. When making a commit, Git will save the repository’s directory tree as well as a link to the parent commit.
To reduce redundancy in storing the commit information, Git will see what has changed in the repository relative to the previous version. If a file in the repository has not changed at the time of the commit, Git doesn’t store the file again, but instead create a link to the previous file as it was already stored.
Below is an illustration of a repository’s commit history. Each version (commit) points to a parent version (commit), and a directory tree is associated with each commit. Some, but not all, files are changed at each commit.
What is a reasonable amount of changes you should have before making a commit? Well, every time you make a commit, you have to submit a concise commit message. This encourages good documentation of the changes you made, and usually you want to make a commit when you have made a modular change to the repository you have been working on.
Another way of illustrating commits: each o represents a commit (consisting of an entire directory tree), and points to a parental commit (Source: MIT’s Git Seminar)
o <-- o <-- o <-- oIt is possible to create a branch structure, in a situation where two separate features of the project are being made in parallel:
o <-- o <-- o <-- o
            ^
             \
              --- o <-- o
When both features are complete, one could merge them together to have an unified, unbranched repository:
o <-- o <-- o <-- o <---- o
            ^            /
             \          v
              --- o <-- o
This workflow of branching and merging is extremely popular in collaborative work!
2.3 Set up
2.3.1 Installing Git
If you are learning via replit, then Git is already installed. See this guide for installation info on your local computer.
2.3.2 Installing GitHub Command Line Tools
If you are learning via replit, then GitHub Command Line Tools is already installed. See this website for installation info on your local computer. This is a piece of software that allows you to connect to GitHub from the command line.
2.3.3 Create a GitHub account
Create your GitHub account here.
2.3.4 Adding your information for Git
This helps Git record your author information when you make commits:
% git config --global user.name "Your Name"
% git config --global user.email "address@email.com"
Replace Your Name with your name and address@email.com with your email address.
2.3.5 Connecting Git to your GitHub account
We connect Git to your GitHub account via GitHub CLI:
% gh auth loginYou will be asked how you want to log in, and pick the following:
? What account do you want to log into? GitHub.com
? What is your preferred protocol for Git operations? HTTPS
? Authenticate Git with your GitHub credentials? Yes
? How would you like to authenticate GitHub CLI? Login with a web browser
You will be given a code, and you will provide that code to GitHub via https://github.com/login/device.
2.4 Cloning a repository
We make a copy of a remote GitHub repository (https://github.com/fhdsl/Collaborative_Git_GitHub_Student_Practice) locally on our computer to practice. In order to do that,
% git clone https://github.com/fhdsl/Collaborative_Git_GitHub_Student_Practice.git
Cloning into 'Collaborative_Git_GitHub_Student_Practice'...
remote: Enumerating objects: 94, done.
remote: Counting objects: 100% (51/51), done.
remote: Compressing objects: 100% (45/45), done.
remote: Total 94 (delta 32), reused 12 (delta 5), pack-reused 43
Receiving objects: 100% (94/94), 23.52 KiB | 7.84 MiB/s, done.
Resolving deltas: 100% (37/37), done.

% cd Collaborative_Git_GitHub_Student_Practice/
This folder is a Git repository. Git has created a hidden folder .git/ that will store all the commit version history. We will take a quick look, but the it is Git’s job to take care of this folder.
% ls -a
.   ..  .git
% cd .git
% ls -l
total 24
-rw-r--r--   1 clo2  staff   21 Sep  5 16:15 HEAD
-rw-r--r--   1 clo2  staff  137 Sep  5 16:15 config
-rw-r--r--   1 clo2  staff   73 Sep  5 16:15 description
drwxr-xr-x  15 clo2  staff  480 Sep  5 16:15 hooks
drwxr-xr-x   3 clo2  staff   96 Sep  5 16:15 info
drwxr-xr-x   4 clo2  staff  128 Sep  5 16:15 objects
drwxr-xr-x   4 clo2  staff  128 Sep  5 16:15 refs
% cd ..
Let’s exit this folder and run git status to understand the current state of this repository.
~/IntroGitDaSL/Collaborative_Git_GitHub_Student_Practice$ git status
On branch main
Your branch is up to date with 'origin/main'.

nothing to commit, working tree clean
We will create some files in this repository, and make our first commit. Notice that in the message of git status, it gives suggestions on what you can do. We will create a file, and commit it to our repository. Before we do so, we have some more concepts to unpack.
2.5 Staging Model to make commits
In addition to the Git Data Model, there is a Staging Model to keep in mind when trying to make commits. In the simplest version control system, one could imagine a commit command that takes a snapshot of the repository’s directory and stores it as the commit. In Git, there is an intermediate staged state so that you can selective decide which files from your repository should be in the commit.
Why offer this intermediate staging ground? Perhaps, in a rush, you implemented two modular changes to your code in two different files, respectively. You want to make two separate commits, one for each change, so you stage one file, commit that one file, and then stage the second file, and then commit that second file. Or perhaps, during your analysis, you generated a bunch of temporary files that isn’t necessary for the software to run, so you don’t stage these temporary files to commit. Or perhaps, you have sensitive PHI data in your repository’s directory and should not commit it.
From ProGit, once Git tracks your file, Git has three main states that your files can reside in: modified, staged, and committed:
Modified means that you have changed the file but have not committed it to your local repository yet.
Staged means that you have marked a modified file in its current version to go into your next commit.
Committed means that the data is safely stored in your local repository.
2.6 Making your first commit
Create a file named README, and add some text to it using a text editor, such as nano.
% touch READMELet’s look at the status:
% git status
On branch main
Untracked files:
  (use "git add <file>..." to include in what will be committed)
    README

nothing added to commit but untracked files present (use "git add" to track)
We see that README is untracked, which means Git does not consider the file relevant for the repository yet. Let’s add it via git add.
% git add README
% git status
On branch main
Changes to be committed:
  (use "git restore --staged <file>..." to unstage)
    new file:   README
Now, README is “staged” (and thus also “tracked”). We will commit it to our repository using git commit and option -m to write a short commit message. If you don’t specifiy the -m option, Git will open up your defaul text editor and ask you to write something.
% git commit -m "Added README"
[main bb926a2] Added README
 1 file changed, 1 insertion(+)
 create mode 100644 README
clo2@MGQQR2YQRT9 sandbox % git status
On branch main
nothing to commit, working tree clean
Great, you have completed your first commit! README is “committed”.
Now, let’s modify README again. What’s the status?
% nano README
% git status
On branch main
Changes not staged for commit:
  (use "git add <file>..." to update what will be committed)
  (use "git restore <file>..." to discard changes in working directory)
    modified:   README
README is in the “modified” state. Notice that unlike the first time we made changes to README, it is already “tracked”, because it was “committed” in the last commit. If we use git add, then it will be “staged”:
% git add README
% git status
On branch main
Changes to be committed:
  (use "git restore --staged <file>..." to unstage)
    modified:   README
You should finish the commit by git commit.

2.8 Optional: Undoing
2.8.1 Unstage a file
Suppose you staged a file, and then realized you don’t want the file to be staged for the commit. To unstage the file so that it returns to “modified”, run git restore --staged [fileName].
2.8.2 Unmodify a file
After your commit, you make some new changes to a file so that it is “modified” You realized that you are no longer interested in this modification and want to un-modify it back to the last commit. Run: git restore [fileName].
Warning: This cannot be undone!
2.8.3 Revert a commit
After several commits, you realized that you wanted to undo a specific commit. Run: git revert [commit identifier]. This will undo that commit. However, if the content of that commit has experienced intermediate changes, it will raise a conflict.
You can find the “commit identifier” via git log to see your commit history.
2.9 Connecting to GitHub (remote)
So far, we have talked about how to use your Git repository to keep track of your own work, but a big feature of Git is that you can collaborate with others. To do so, remotes are repositories hosted often on a server, such as GitHub, so that other people can access the the remote from their local computer.
In our practice so far, we cloned a remote repository to our local computer. Now, we will see how we can put out work back to the remote. The command git push will put your local repository on the remote repository.
~/IntroGitDaSL/Collaborative_Git_GitHub_Student_Practice$ git push
Enumerating objects: 5, done.
Counting objects: 100% (5/5), done.
Delta compression using up to 8 threads
Compressing objects: 100% (3/3), done.
Writing objects: 100% (3/3), 313 bytes | 313.00 KiB/s, done.
Total 3 (delta 1), reused 0 (delta 0), pack-reused 0
remote: Resolving deltas: 100% (1/1), completed with 1 local object.
To https://github.com/fhdsl/Collaborative_Git_GitHub_Student_Practice.git
   6e97634..0c82b47  main -> main
If someone else has made updates to the remote repository and you want to update it locally, use git pull.
Now, here is what our staging model looks like:

2.10 Branching and Merging
So far, we have considered just working on our own. But when multiple people work on a GitHub repository, how can we keep track of multiple people’s work clearly and transparently without stepping on each others’ toes?
Suppose we start a project in a linear commit structure, as before:
o <-- o <-- o <-- oSuppose that another collaborator joins in and wants to develop a separate feature, while you continue on the project. It is possible to create a branch structure, in a situation where two separate features of the project are being made in parallel:
o <-- o <-- o <-- o
            ^
             \
              --- o <-- o
When both features are complete, one could merge them together to have an unified, unbranched repository:
o <-- o <-- o <-- o <---- o
            ^            /
             \          v
              --- o <-- o
This process in Git is called branching, when two branching commit paths are created, and merging, when two branches are integrated together.
This branch and merge workflow can be used for collaborative projects, but can also be useful for a single user. A project maintained by one developer may branch out into various working ideas, and this branch and merge workflow keeps track of that nicely.
2.11 Branching
We first create a branch, called clo2_development, on our remote repository.

The branch clo2_development is created on the remote, but it hasn’t been updated locally. We run git pull locally to update it and switch to that branch via git checkout.
% git pull
From https://github.com/fhdsl/S2_Collaborative_Git_GitHub_Student_Practice
 * [new branch]      clo2_development -> origin/clo2_development
Already up to date.

% git checkout clo2_development
Branch 'clo2_development' set up to track remote branch 'clo2_development' from 'origin'.
Switched to a new branch 'clo2_development'
We can use git checkout main to look switch back to our main branch.
We can also use git branch to see the branches on a repository.
Now, we will make changes to the branch. Let’s create a file that is unique to you.
% touch clo2.txt
% echo "hello" > clo2.txt
% git add clo2.txt
% git commit -m "Created clo2.txt"
% git push
After a variable number of commits and pushes, your remote branch is a different version of the remote main branch with new improvements. But our main goal is to add those improvements to the main remote branch. To start this process of bringing in new changes, we will create a pull request.
When you have pushed changes to the branch, you will see an option to “Compare & pull request” on the GitHub website. Click on it.

2.12 Pull Requests
A pull request is a way to propose changes from a branch before it is merged back into the main repository. It is just like git merge, but it requires more documentation and confirmation. For instance, a collaborator can create their own work on a branch, and then create a pull request to have that new branch’s feature to be integrated back to the main branch. The owner of the repository sometimes review the proposed changes before accepting the pull request.

You will see that you are trying to merge clo2_development into main on the remote. It also requires you to write a description of what you did on your branch.

After you create the pull request, the author of the repository gets to decide whether a merge should be done on the pull request. Here, you are a contributing author of the repository, so you can approve it yourself. But you can imagine a situation where you need someone else to approve of the pull request: a dialogue can take place in this approval process, leading to additional commits to be made before the pull request is approved.

Click “Merge pull request” to finish!
2.12.1 Merge conflicts during pull requests
Sometimes, when merging branches together during a pull request, there will be changes that will be in conflicts with each other. Again, GitHub will stop the process and ask you fix it. A nice guide to this can be found here.
2.13 Appendix: Other ways of interacting with Git and GitHub
If interfacing with Git is not your favorite way to do so, there are GUI-based software that allows you to use Git interactively. Some popular ones include:
A nice troubleshooting guide
2.14 Appendix: References
ProGit: We covered chapters 1-3 in this workshop.
MIT’s Git Seminar: A more computer science explanation of how Git works.
Explain Shell: Access Shell and Git manual and help pages in an easy-to-read way.
Bryan J. 2017. Excuse me, do you have a moment to talk about version control? PeerJ Preprints 5:e3159v2 https://doi.org/10.7287/peerj.preprints.3159v2
